こんばんは、コタツです。
現在Xamarin.Formsを使って、地図を使ったアプリを開発しようと思ってます。xamarin.Formsでの地図の表示方法を調べてみると、「xamarin.Forms.Map」というのを見つけて使ってみたのですが、できることが少ない。。。基本的には地図を表示してアイコンを置くぐらいしかできなくて、私がやりたいことは全くできませんでした。AndroidとiOS、それぞれで実装しようと考えていたときに「xamarin.Forms.GoogleMaps」を見つけました。「xamarin.Forms.Maps」との比較はこちら
現在私がやりたいことができてしまうので、「xamarin.Forms.GoogleMaps」を利用して開発を進めていきたいと思います。
今回は「xamarin.Forms.GoogleMap」の導入の仕方をまとめてみました。
1.xamarin.Formsのプロジェクト作成
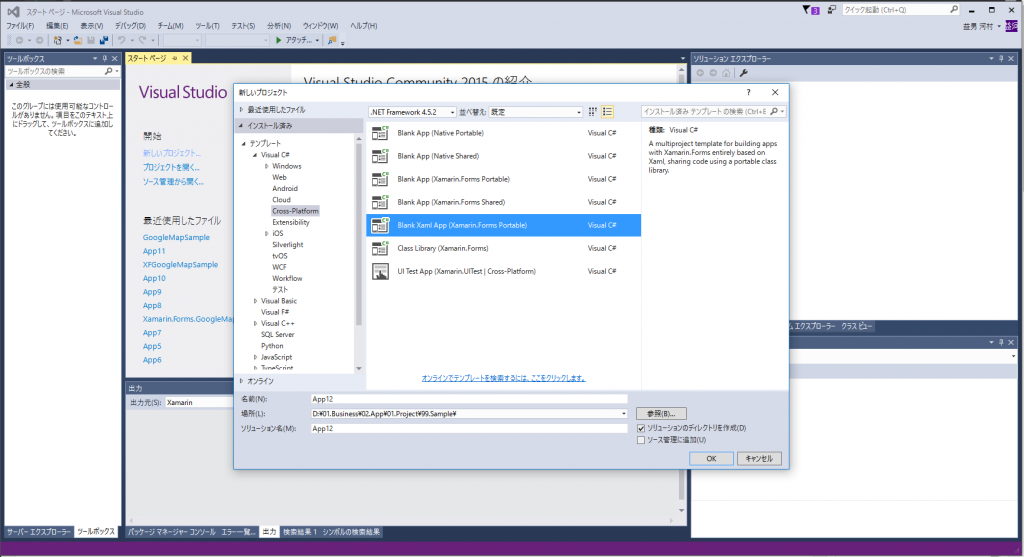
Visual Studioを開いて「新しいプロジェクト」→「Cross-Patform」→「Blank Xaml App(Xamarin Forms Portable)」を選択して、「OK」をクリックします。
2.xamarin.Forms.GoogleMapパッケージの導入
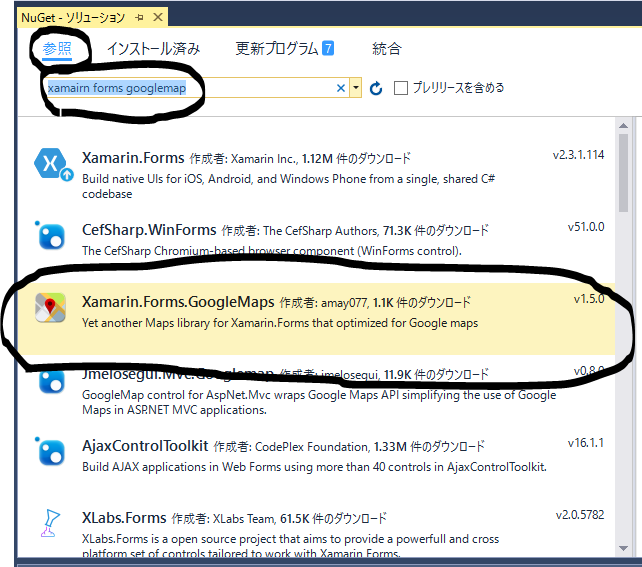
「ツール」→「NuGet パッケージマネージャー」→「ソリューションの NuGet パッケージの管理」をクリックします。「参照」を選択して、検索ダイアログに「xamairn forms googlemap」と記載すると「Xamarin Forms GoogleMap」のパッケージが表示されます。
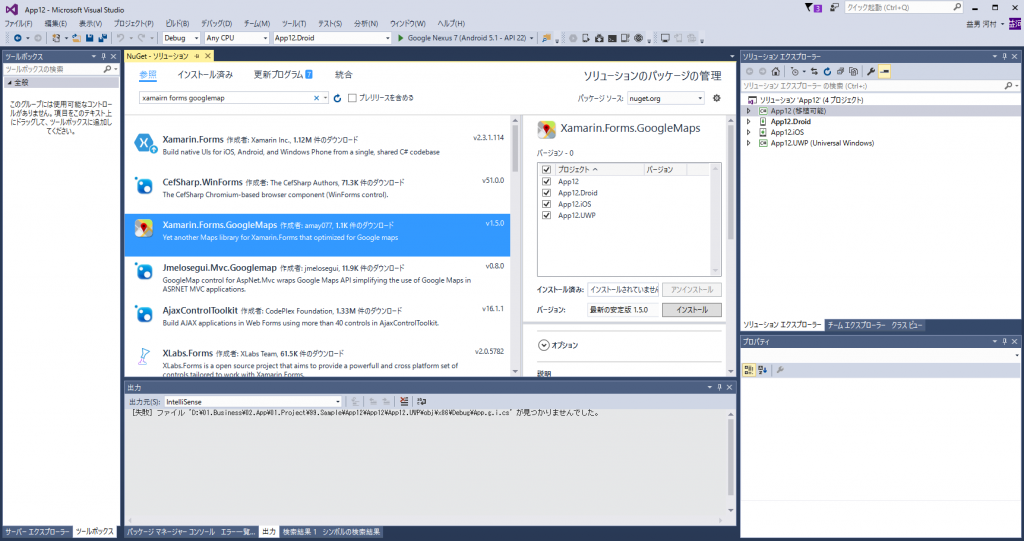
インストールするプロジェクトを選択して「インストール」をクリックします。
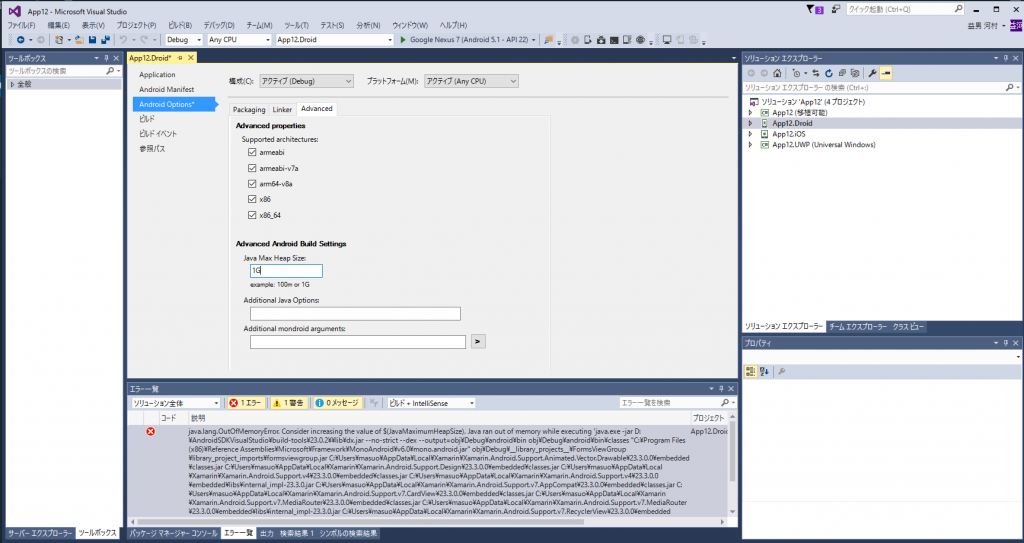
※私の環境だけかもしれませんが、インストール後にビルドをすると「java.lang.OutOfMemoryError」が発生します。「App12.Droid」プロジェクトの設定画面の「Android Options」→「Advance」内の「Java Max Heap Size」の欄に「1G」と記載して再度ビルドをするとビルドは成功します。
3.xamarin.Forms.GoogleMapの初期化
xamarin.Forms.GoogleMapの初期化は、各プラットフォームに記載する必要があります。GoogleMap Keyはあらかじめ入手しておいてください。
Androidは「MainActivity.cs」に追加します。
|
1 2 3 4 5 6 7 8 9 10 11 12 13 14 15 16 17 18 19 20 21 22 23 24 25 26 27 |
using System; using Android.App; using Android.Content.PM; using Android.Runtime; using Android.Views; using Android.Widget; using Android.OS; namespace App12.Droid { [Activity(Label = "App12", Icon = "@drawable/icon", Theme = "@style/MainTheme", MainLauncher = true, ConfigurationChanges = ConfigChanges.ScreenSize | ConfigChanges.Orientation)] public class MainActivity : global::Xamarin.Forms.Platform.Android.FormsAppCompatActivity { protected override void OnCreate(Bundle bundle) { TabLayoutResource = Resource.Layout.Tabbar; ToolbarResource = Resource.Layout.Toolbar; base.OnCreate(bundle); global::Xamarin.Forms.Forms.Init(this, bundle); Xamarin.FormsGoogleMaps.Init(this, bundle); // ←追加 LoadApplication(new App()); } } } |
またAndroidには「MyApp.cs」(クラス名は何でもいいかも??)を作成して、下記のコードを記載します。
|
1 2 3 4 5 6 7 8 9 10 11 12 13 14 15 16 17 18 19 20 21 22 23 24 25 |
using System; using System.Collections.Generic; using System.Linq; using System.Text; using Android.App; using Android.Content; using Android.OS; using Android.Runtime; using Android.Views; using Android.Widget; namespace App12.Droid { [Application] [MetaData("com.google.android.maps.v2.API_KEY", Value = "ここにあなたが取得したGoogleMapKeyを入力")] public class MyApp : Application { public MyApp(IntPtr javaReference, JniHandleOwnership transfer) : base(javaReference, transfer) { } } } |
iOSの場合は「AppDelegate.cs」に追加します。
|
1 2 3 4 5 6 7 8 9 10 11 12 13 14 15 16 17 18 19 20 21 22 |
using System; using System.Collections.Generic; using System.Linq; using Foundation; using UIKit; namespace App12.iOS { [Register("AppDelegate")] public partial class AppDelegate : global::Xamarin.Forms.Platform.iOS.FormsApplicationDelegate { public override bool FinishedLaunching(UIApplication app, NSDictionary options) { global::Xamarin.Forms.Forms.Init(); Xamarin.FormsGoogleMaps.Init("ここにあなたが取得したGoogleMapKeyを入力"); // ←追加 LoadApplication(new App()); return base.FinishedLaunching(app, options); } } } |
地図を表示
「MainPage.xaml」を下記のように修正します。
|
1 2 3 4 5 6 7 8 9 10 11 12 13 14 15 16 |
<?xml version="1.0" encoding="utf-8" ?> <ContentPage xmlns="http://xamarin.com/schemas/2014/forms" xmlns:x="http://schemas.microsoft.com/winfx/2009/xaml" xmlns:maps="clr-namespace:Xamarin.Forms.GoogleMaps;assembly=Xamarin.Forms.GoogleMaps" xmlns:local="clr-namespace:App12" x:Class="App12.MainPage"> <ContentPage.Content> <StackLayout HorizontalOptions="Fill" VerticalOptions="Fill"> <maps:Map x:Name="map" VerticalOptions="FillAndExpand"/> </StackLayout> </ContentPage.Content> </ContentPage> |
実行すると下記の画面が表示されます。
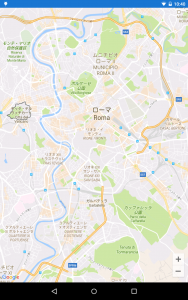
まとめ
今回は「Xamarin.Forms.GoogleMap」を利用してGoogleMapを表示してみました。使い方も簡単で凄く便利で助かります。次回からその他の機能も使っていろいろと試していきたいと思います。

